That's my name and i just wanna shared everything that i know to all the people in this world or in the other world. this blog is the presentation of my own story or whatever i know. i apologize if there is something wrong with my blog

Tampilkan postingan dengan label Internet. Tampilkan semua postingan

Sabtu, 13 Juli 2013

Daftar nama port yang sering digunakan


Dalam protokol jaringan TCP/IP, sebuah port adalah mekanisme yang mengizinkan sebuah komputer untuk mendukung beberapa sesi koneksi dengan komputer lainnya dan program di dalam jaringan. Port dapat mengidentifikasikan aplikasi dan layanan yang menggunakan koneksi di dalam jaringan TCP/IP. Sehingga, port juga mengidentifikasikan sebuah proses tertentu di mana sebuah server dapat memberikan sebuah layanan kepada klien atau bagaimana sebuah klien dapat mengakses sebuah layanan yang ada dalam server. Port dapat dikenali dengan angka 16-bit (dua byte) yang disebut dengan Port Number dan diklasifikasikan dengan jenis protokol transport apa yang digunakan, ke dalam Port TCP dan Port UDP. Karena memiliki angka 16-bit, maka total maksimum jumlah port untuk setiap protokol transport yang digunakan adalah 65536 buah.
Berikut ini daftar port yang sering digunakan
PORT
TCP
UDP
KETERANGAN
7 TCP UDP Echo protocol ( protokol untuk ping )
15 TCP UDP Netstat service ( melihat aktivitas jaringan )
20 TCP
FTP (File Transfer Protocol, Default data)
21 TCP
FTP (File Transfer Protocol, control, connection dialog)
22 TCP
SSH (Sistem secure shell), SCP (SSH untuk copy)
23 TCP
Telnet
25 TCP
SMTP (outgoing email)
43 TCP
Whois protocol ( command untuk melihat informasi host dalam jaringan )
53 TCP UDP Domain name server (DNS)
67
UDP Dinamic Host Connection Protocol ( DHCP )
80 TCP UDP HTTP
110 TCP UDP Pop 3 (incoming email)
137 TCP UDP Netbios name service
138 TCP UDP Netbios Datagram service
139 TCP UDP Netbios Session service
220 TCP UDP Internet message Access protocol ( IMAP ) vertion 3
389 TCP UDP Lighweight Directory Access Protocol ( merupakan DHCP di Linux )
443 TCP
HTTPS ( versi HTTP yang secure / aman )
513 TCP
Remote login ( melakukan login remote desktop )
520
UDP Routing information protocol ( untuk melihat routing jaringan )
1194 TCP UDP openVPN ( virtual private network ) untuk konek ke komputer di luar jaringan
5900 TCP UDP Virtual network computing ( VNC ) , remote komputer
8080 TCP
HTTP web proxy
10000 TCP
Webmin Linux
Demikian sebagian dari daftar port yang sering kita gunakan, masih banyak port-port yang mungkin belum kita ketahui, untuk lebih lengkapnya klik disini
Read more »

Kamis, 11 April 2013

Domain gratisan unik utk Blog


Domain gratisan COCC mati emang sedikit bikin resah para pecinta gratisan, namun tenang saja diluar sana masih banyak resource untuk (sub)domain gratisan, dengan nama-nama yang unik pula...


yang suport DNS management,
cu.cc, cz.cc , dot tk, uni.me, FreeDNS :  mungkin temen-temen kaskuser sudah akrab sama website ini...

yang nggak support dns namun include hostingan...
subdomain.com   : disini ada ratusan nama subdomain yang bisa agan pilih... salah satunya yang populer adalah  co.de
*disitu ada iklan namun bisa dihilangkan, ada triknya

Yang Cuman Frame Cloaking
dot co dot nr


namun, ane kurang cocok sih pake domain itu ) *kecocokan hati saja hehehe
yang ane recomended adalah ini, karena ini sudah support setting dns, namanya lucu dan lebih stabil serta nggak pake syarat macem-macem...

kalo ane, biasanya pake layanan dari popnic.com selain itu ada juga saudara2nya mediadots dan juga smartdots, kenapa ane menggunakan ini,
-> Pilihan (sub) domainya banyak

-> belum di diblok (moga gak kayak cocc nasibnya)
-> masih bisa dishare di kaskus dan facebook

oke langsung aje...

1. POPNIC -> popnic.com
Pilihan domainnya,
Spoiler for popnic
www.Your-Name.uk.pn
www.Your-Name.co.uk.pn
www.Your-Name.us.pn
www.Your-Name.ca.pn
www.Your-Name.au.pn
www.Your-Name.com.au.pn
www.Your-Name.de.pn
www.Your-Name.at.pn
www.Your-Name.co.at.pn
www.Your-Name.ch.pn
www.Your-Name.fr.pn
www.Your-Name.it.pn
www.Your-Name.cn.pn
www.Your-Name.jp.pn


2. Mediadots -> mediadots.com
Spoiler for mediadots
www.Your-Name.us.mn
www.Your-Name.uk.mn
www.Your-Name.co.uk.mn
www.Your-Name.eu.mn
www.Your-Name.au.mn
www.Your-Name.com.au.mn
www.Your-Name.at.mn
www.Your-Name.co.at.mn
www.Your-Name.fr.mn
www.Your-Name.nl.mn
www.Your-Name.it.mn
www.Your-Name.cn.mn
www.Your-Name.jp.mn


3. Smartdots -> smartdots.com
Spoiler for smardots
www.Your-Name.net.tc
www.Your-Name.eu.tc
www.Your-Name.us.tc
www.Your-Name.uk.tc
www.Your-Name.co.uk.tc
www.Your-Name.me.uk.tc
www.Your-Name.org.uk.tc
www.Your-Name.au.tc
www.Your-Name.com.au.tc
www.Your-Name.pro.tc
www.Your-Name.shop.tc
www.Your-Name.edu.tc
www.Your-Name.int.tc
www.Your-Name.de.tc
www.Your-Name.at.tc
www.Your-Name.co.at.tc
www.Your-Name.ch.tc


4. unonic -> unonic.com
Spoiler for unonic

.net.tf, .us.tf, .eu.tf, .ca.tf, .int.tf, .edu.tf, .de.tf, .at.tf, .co.at.tf, .ch.tf, *.ru.tf, .pl.tf, .cz.tf, .bg.tf, dan .sg.tf

Cara daftarnya pun mudah...
Spoiler for satu

Pertama pilih domain yang agan inginkan...
lalu daftarkan email dan password agan, lalu masukan verifikasi captcha, disini sedikit beda dengan web lainnya, captcha menggunakan gambar, agan disuruh pilih gambar yang disebutkan diatasnya sebanyak 3kali.
Spoiler for dua


kalo sudah klik submit, dan silakan buka email agan dan klik link konfirmasinya....
kaloo sudah masuk kembali ke mediadots, dan lengkapi data diri agan...
Spoiler for dua


setelah itu agan akan dibawa ke halaman dashboard untuk pengaturan domain, pilih box bertuliskan domain...
Spoiler for dua


oke kalo sudah muncul kotak pengaturan domain, pilih yang bagian bawah, itu untuk setting nameserver...
Spoiler for dua


Nah, untuk pertama kali, klik dulu tombol yang ada di atas itu...
"Become a beta tester now"
ini membutuhkan waktu sekitar 15 menit untuk aktif dan bisa menyeting DNS untuk sub domain kamu...
Spoiler for dua


lima belas menit kemudian....

pengaturan DNS sudah aktif, nah silakan edit DNS domain agan..
.
Spoiler for dua


ane buat trik ini gak ada afiliasinya lho sama mereka...
apalagi dapet duit dari mereka   
cuman sekedar berbagi pengalaman saja hehe

contoh domain yang pernah ane bikin:
pak.us.mn , mas.uk.mn

agan2 sekalian tau penyedia sub domain gratisan lainnya? monggo share dimari
Read more »

Senin, 14 Februari 2011

Hack Jaringan Wifi Dengan Mudah

Wah kali ini infonya bagaimana cara ngehack koneksi Wi-Fi biar bisa internetan gratis!!.  Sebelumnya saya berpesan gunakan cara ini sesuai kebutuhan anda saja jangan keterlaluan ntar kasihan yang bayar Dong.. ,  Tip ini hanya sebagai pelajaran buat yang ingin coba coba ngehack koneksi Wi-Fi.
Oke yang anda butuhkan disini tentunya seperangkat komputer atau laptop yang dilengkapi dengan modem Wi-Fi. Caranya :
  1. Download software yang diperlukan untuk modal anda ngehack Wi-Fi—> Download.
  2. Download IP Scan Tool —-> Download.
  3. Setelah di download, tentunya harus anda instal kedua software tadi.
  4. Cari lokasi hotspot atau lokasi yang sinyal Wi-Fi nya yg bisa anda deteksi.
  5. Kemudian hidupkan laptop atau kompi anda dan buka Wireless Network dan lihat di sistem tray icon wireless network, lalu klik kanan pilih view Availible Wireless Network kemudian anda connect ke sinyal Wi-Fi yang terdeteksi oleh laptop anda.
  6. Setelah connect,klik kanan sistem tray dan pilih status pada langkah ini anda akan mendapatkan alamat IP yg diberikan kepada kita.Catat IP nya.
  7. Berikutnya buka software IP Scanner yg anda download tadi, masukan no Ip yang anda catat tadi misalnya xxx.xxx.x.xx pada kolom IP Range pertama,tetapi pada angka terakhir IP yg anda dapatkan tadi di ganti dengan angka 1,  misalnya xxx.xxx.x.xx menjadi xxx.xxx.x.1 lalu pada kolom IP Range kedua masukkan juga IP yg sama tetapi ganti angka 1 menjadi angka 300.maka pada kolom IP Range kedua Ip nya menjadi xxx.xxx.x.300 lalu klik tombol start untuk memulai scanning IP ( Tombol Merah ). 

  1. Setelah melakukan scanning maka kita akan mendapatkan data IP yang hidup dan terkoneksi dengan hotspot tersebut.Kemudian lihat IP yang hidup (alive host) yang warna biru. lalu klik kanan pada IP yg hidup tadi warna biru hasilnya –> Show–> Mac Address jika berhasil maka akan muncul kode Mac Address ( Catatan : Terkadang Tidak Muncul Kode Mac Addressnya coba lagi IP lainnya )Jika anda berhasil mendapatkan kode Mac Address . Catat Kodenya.
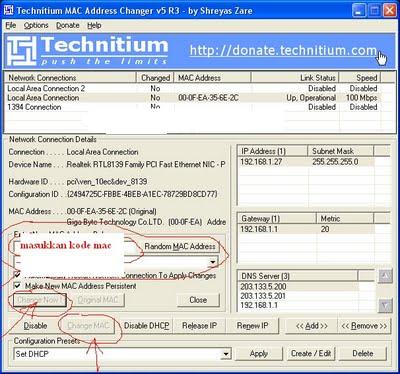
  2. Kemudian buka Software TMAC v5 R3 yang anda download dan instal ke laptop anda. Cari tombol Change MAC maka akan muncul kolom tempat anda memasukkan kode Mac Adrress yang anda catat tadi.Kemudian tekan Change Now. Untuk lebih jelas lihat Screen shotnya :  
  3. Tunggu beberapa saat untuk proses penggantian kode Mac Adrressnya dan koneksi akan terputus sementara dan akan terkoneksi lagi secara otomatis.
  4. Langkah terakhir tentunya seperti yang anda harafkan yaitu koneksi internet gratis dengan membuka browsing anda.
Trik diatas bukan bermaksud mengajarkan anda berbuat jahat! tetapi sebagai pembelajaran bagi anda bahwa semua sistem keamanan Wi-Fi bisa di hack!!!
Read more »

Sabtu, 05 Februari 2011

Bandwidth Monitoring Dengan DU Meter 5.02 Full Crack


Untuk pengguna internet rasanya kita perlu sekali untuk mengetahui bandwidth yang sudah kita gunakan, kecepatan internet, dan semua informasi tentang trafik internet lainnya. Nah, untuk itulah saya share tool DU Meter 5.02 Full Crack agar memudahkan sobat blogger dalam memonitor bandwidth.

DU Meter 5.02
Standart penggunaan DU Meter 5.02 ini sangat lah mudah, sobat blogger hanya perlu menbginstall tool ini, maka nanti akan ada semacam tabel yang berisi informasi trafik internet sobat blogger. Atau kalau sobat blogger yang udah mahir, bisa mencoba fitur DU Meter 5 yang tersedia.

Cara aktivasi DU Meter 5.02 :
  1. Download dan instal DU Meter 5.02
  2. Selesai instal, jangan langsung di running.
  3. Buka task manager, matikan proses "DUMeterSVC".
  4. DU Meter 5.02
  5. Copy dan paste file yang ada di folder crack dalam paket download ke tempat anda menginstall DU Meter 5.02.
  6. Contoh : C:\Program Files\DU Meter
  7. Selesai
  8. Sekarang DU Meter 5.02 sudah full versi.
Selamat mencoba,,

Download DU Meter 5.02 Full Crack
Read more »

MyLanViewer 4.4.2 Full Crack


Butuh aplikasi yang dapat mengetahui siapa saja yang terhubung dengan jaringan kita?? Mungkin sobat blogger bisa menggunakan aplikasi yang bernama MyLanViewer 4.4.2.

MyLanViewer merupakan scanner LAN sederhana yang cocok digunakan untuk jaringan rumah Anda. Dengan menggunakan MyLanViewer Ini, kita bisa melihat siapa saja yang terhubung dengan jaringan kita. Informasi yang diberikan pun lumayan lengkap, seperti sistem operasi yang digunakan, alamat IP, alamat MAC, sumber daya bersama dan rincian teknis lainnya untuk setiap komputer. Anda juga dapat melihat dan mengakses shared folder.

Cara aktivasi :
  1. Download dan instal MyLanViewer 4.4.2
  2. Copy dan paste file yang berada di folder crack ke tempat anda menginstal MyLanViewer 4.4.2.
  3. Jalankan MyLanViewer 4.4.2.
  4. Bila di tanya nama dan kode aktivasinya, isikan sembarang aja.
  5. Selesai.
Info : MyLanViewer 4.4.2 dapat digunakan di LAN ataupun WLAN.

Download MyLanViewer 4.4.2 Full Crack
Read more »

Kamis, 10 Juni 2010

IP WHOIS LOOKUP !!!

Go to this link to get more specific answer
Read more »

IP Address Lookup

The IP Address Lookup tool often referred to as IP Lookup, Lookup IP, Lookup IP Address, IP Address Location, IP Location, and IP Locator is designed to give you an idea of where your IP Address or the IP Address you lookup is located. This tool is not 100% accurate due to many different factors. Some of those factors include where the owner of the IP has it registered, where the agency that controls the IP is located, proxies, cellular IPs, etc. If you are in the US and the controlling agency of the IP is located in Canada, chances are your IP location will show as Canada. Showing a Canadian IP while in the US is very common among Blackberry users on the Verizon network.

The results of this IP Address Lookup utility include the IP Address, Host Name, City, Region / State, Postal / Zip Code, Country Name, Country Code, Time Zone, Latitude, Longitude, ISP, Domain Name, Net Speed, and IP Decimal.

Often, people think if they lookup an IP address, that they are going to find the physical postal address of the user assigned the IP in question. This is simply not true. At this time, we are not aware of any IP address database that will give you the exact physical postal address of the IP address you lookup. At best, you'll get the exact city in which the user of the IP is located. For an exact physical address you would need to contact the ISP (Internet Service Provider) of the IP address in question. However, without a police warrant, or some sort of legal document forcing the ISP to turn over the information, don't expect them to give you the physical postal address of the user that was assigned the IP at the time you received the offensive email, or other means of offensive / questionable communication from said IP. The best you can do in this case is to file a complaint with the ISP and forward them all of the information from the offensive / questionable communication regarding the complaint. If you have any questions about the IP Address Lookup tool or the results, please check out our IP Address Lookup Forum.

For a more thorough definition of IP Address Lookup, please refer to the definition article at Wikipedia.

Read more »

What Is MAC Cloning ?

MAC cloning can only be done at your router providing it has those capabilities. Most ISPs assign their IPs based on the MAC address in your equipment. If the MAC address of your router is 00-11-22-33-44-55 and you connect to your ISP, the DHCP server records your MAC and assigns an IP. If you disconnect from the ISP, you lose your IP address. The next time you connect, the DHCP server sees your MAC, looks to see if it has assigned an IP address to you before. If it has and the lease time has not expired, it will most likely give you the same IP address you had before disconnecting. Why clone a MAC address? New MAC address most likely equals new IP. How to clone your MAC and if your router has this feature is dependent on the router itself. You’ll need to find the instructions on the manufacturer’s website. Check out our Router Support page to get started.
Read more »

Router Support

A lot of Quests in the What Is My IP Forum will ask us for help with their router. Unless it's one we specifically own, our help will be limited. The links below are to provide users a way to find their users manual on their Routers Manufacturer's site. If you've still got questions, you can ask them in the Router Configuration Forum.
Read more »

UNIX IP Commands

Display Current Config for all NIC's: ifconfig

Display Current Config for dc0: ifconfig dc0

Assign multiple IP's: ifconfig dc0:0 192.168.1.2

Assign second IP: ifconfig dc0:1 192.168.1.3

Disable network card: ifconfig dc0 down

Enable network card: ifconfig dc0 up

Assign IP/Subnet: ifconfig dc0 inet 192.168.1.2 netmask 255.255.255.0

Assign Gateway: route delete default && route add default 192.168.1.1

*You MUST be at the ROOT user to make/save any changes. You will need to save your changes in the /etc/rc.conf file. Network cards are referred to as dc0, dc1, dc2, etc based on their position on the PCI bus.
*Special thanks to Romanov Sergey Vladimirovich from Moscow for the UNIX commands!


Read more »

Linux IP Commands

Display Current Config for all NIC's: ifconfig

Display Current Config for eth0: ifconfig eth0

Assign IP: ifconfig eth0 192.168.1.2

Ping: ping -c 3 192.168.1.1

Assign multiple IP's: ifconfig eth0:0 192.168.1.2

Assign second IP: ifconfig eth0:1 192.168.1.3

Disable network card: ifconfig eth0 down

Enable network card: ifconfig eth0 up

View current routing table: route "or" route -n

View arp cache: arp "or" arp -n

Assign IP/Subnet: ifconfig eth0 192.168.1.2 netmask 255.255.255.0

Assign Default Gateway: route add default gw 192.168.1.1

Trace Route: traceroute www.whatismyip.com

Trace Path: tracepath www.whatismyip.com

DNS Test: host www.whatismyip.com

Advanced DNS Test: dig www.whatismyip.com

Reverse Lookup: host 66.11.119.69

Advanced Reverse Lookup: dig -x 66.11.119.69

*You MUST be at the ROOT user to make/save any changes. Linux users, your distribution will determine the location of your network config file which will need to be updated and saved in order for the changes to remain in effect after rebooting. Network cards are referred to as eth0, eth1, eth2, etc based on their position on the PCI bus.


*Special thanks to Gergely for the Linux commands!


Read more »

DOS / Windows IP Commands

Display Connection Configuration: ipconfig /all

Display DNS Cache Info: ipconfig /displaydns

Clear DNS Cache: ipconfig /flushdns

Release All IP Address Connections: ipconfig /release

Renew All IP Address Connections: ipconfig /renew

Re-Register the DNS connections: ipconfig /registerdns

Change/Modify DHCP Class ID: ipconfig /setclassid

Network Connections: control netconnections

Network Setup Wizard: netsetup.cpl

Test Connectivity: ping kitty.com

Trace IP address Route: tracert

Displays the TCP/IP protocol sessions: netstat

Display Local Route: route

Display Resolved MAC Addresses: arp

Display Name of Computer Currently on: hostname

Display DHCP Class Information: ipconfig /showclassid

NameServer Lookup: nslookup kitty.com

Read more »

What is a MAC Address ?

A MAC address is a physical hardware address assigned to each device that has the capability of connecting to a network. The internet is nothing more than a large network. The MAC address is something that is assigned in the chip on the device and is not something the user can change.

Read more »

What is IP Address Management ?

What is IP Address Management or IPAM?

By breaking down and assigning your internal IP block into segments allows faster troubleshooting when monitoring the network and seeing an erratic IP. Because you’ve segmented the IPs out, you’ll know exactly which segment it’s coming from and can narrow down finding it faster.

Why manage IPs?

Easily track when network monitor software shows errors. If you’re logged on locally to a User’s computer and you’re mapping batch file didn’t run and you need to get a file from one of your servers you don’t have to know the server name, you can simply type \\192.168.1.x to get access to the server you’re needing the file from.
In the scenario I explain below, we’ll have 1 External IP, 5 servers ((Static) 1 handles DHCP (2k3)), 10 printers (Static), 200 wired PCs/users (DHCP).

There are several different ways to set up exact scenarios. This scenario will explain IP Address Management (IPAM) for a small network using my experience and knowledge.

For ease of use, we’re going to say that this is in a brand new facility where no IPs have been assigned and you, as the LAN Admin, have just been told your internet connection is in place and ready to use (this is where the single external IP comes from).

You already know how many devices will be connected to your network in the beginning so it’s now time to lay out a plan. Since most everyone is familiar with the 192.168.1.x IPs, I’ll stick with those. Technically, your first IP is 192.168.1.0 and your last is 192.168.1.255 which gives you 256 IPs. I don’t know of anyone that uses 192.168.1.0. Since we’re human, the first number to us is 1. To a computer, the first number is 0. I don’t think .255 is useable so really, you have 254 IPs available. Your 5 servers should get your first 5 IP addresses and assign them statically even though you can control static assignment in DHCP. You don’t want there to be any chance of these servers losing their IP addresses so you don’t want them to depend on DHCP for IP assignment.

Server 1 also happens to be your DHCP server: 192.168.1.1
Server 2: 192.168.1.2
Server 3: 192.168.1.3
Server 4: 192.168.1.4
Server 5: 192.168.1.5

You have to account for growth so leave .6 through .9 open for future servers whether they’re physical or virtual, they’ll need an IP.

You have 10 printers that will be used by multiple users. IPs in the next segment of the block can be statically assigned at the printer or via the DHCP server…your choice. Every office has a “main” printer/copier/fax. Give it 192.168.1.10. If you think far enough in advance and know that Group 1 will use printer 1 then assign printer 1 192.168.10.11, printer 2 for Group 2 would get 192.168.10.12, etc. all the way through .19. In my experience, if there’s any one piece of equipment you’ll add to your network more than any other, it’ll be a printer. Somebody in one of those groups will get tired of walking 15 feet to the printer and suck up to the boss to get their own printer. Then, people within 5 feet of that person will want to share with them so they don’t have to walk 15 feet to get their stuff either. So that printer will need to be on the network vs. just connected directly to the complainers PC and shared. Lucky you. By the way, remember at the beginning I said this was a brand new facility….hopefully, the people that ran the network drops put in 2 cables at each requested location. Otherwise, you’ll either need to run a cable or take the easy way out and install a 5 port switch. Trust me when I say leave plenty of IPs open for future printers. I would assign .10 through .29 for printers. This gives you 20 IPs for printers so you’ll have 10 IPs free after installing the initial 10 printers.

Finally, we have 200 PCs that will all be hardwired to the LAN and will each need an IP. Starting at .30 going through and including .254 gives you 225 IPs. I’d start my scope in DHCP at .40 through .254. That gives you 215 IPs for users (15 extra) and that also leaves 10 IPs open at the lower range (.30 through .39) for device growth. One thing I didn’t mention yet was managed switches. They’ll need IPs. You can do those at the high end of the spectrum so they’re “out of the way”. Maybe assign them .254, .253, .252, etc. depending on how many you have.

IPAM can get pretty deep especially if you’re dealing with 100’s of PCs and devices. This is where subnetting comes in. I’ll go into further detail in another article, but just for gee whiz this is the tip of the iceberg on subnetting:

For example, 192.168.1.1 with a subnet of 255.255.255.0 is not on the same network as 192.168.2.1 with a subnet of 255.255.255.0 even though they both might be in the same building. However, if you change the third octet in the subnet to 0 like this 255.255.0.0 now 192.168.1.1 with a subnet of 255.255.0.0 and 192.168.2.1 with a subnet of 255.255.0.0 are on the same network. The 255 is sort of a true/false in simple terms, but can get pretty complex if you’re trying to keep networks separate. I’m not a subnet guru by any means, but if you Google subnet calculator you can get a pretty good appreciation for its complexity.

Read more »

How To Change Your IP Address ?

How do I change my IP? There are MANY methods to change your IP. Some methods will work for you but may not work for someone else and vice versa. If your IP is static, then you CAN’T change it without contacting your ISP. If you have a long lease time (explained in this article) on your IP then you won’t be able to change your IP without cloning your MAC address, which I’ll explain later in this article. It definitely helps if you know how the IP is being assigned to you. You can read our DHCP definition to get a better understanding.


What is an IP lease time? IP lease time is the amount of time your ISP determines you’ll be assigned a particular IP. Some IP lease times are just a few days and other IP lease times could be set for a year or more. This setting is completely up to your ISP.

One of the easier methods to change your IP is to turn off your modem/router/computer overnight. Then turn it back on the following morning. This method WILL NOT work if your ISP has a long lease time set for your IP.


The following method will ONLY work if your computer is being assigned your external IP and not a router.
If your connection is direct to your computer and your computer gets the public IP and not a router, you can try this:

For Windows 2000, XP, and 2003

1. Click Start
2. Click Run
3. Type in cmd and hit ok (this opens a Command Prompt)
4. Type ipconfig /release and hit enter
5. Click Start, Control Panel, and open Network Connections
6. Find and Right click on the active Local Area Connection and choose Properties
7. Double-click on the Internet Protocol (TCP/IP)
8. Click on Use the following IP address
9. Enter a false IP like 123.123.123.123
10. Press Tab and the Subnet Mask section will populate with default numbers
11. Hit OK twice
12. Right click the active Local Area Connection again and choose Properties
13. Double-click on the Internet Protocol (TCP/IP)
14. Choose Obtain an IP address automatically
15. Hit OK twice
16. Check your IP to see if you have a new IP address

For Vista
1. Click Start
2. Click All Programs expand the Accessories menu
3. In the Accessories menu, Right Click Command Prompt and choose Run as administrator
4. Type ipconfig /release and hit enter
5. Click Start, Control Panel, and open Network and Sharing Center. Depending on your view, you may  have to click Network and Internet      before you see the Network and Sharing Center icon
6. From the Tasks menu on the left, choose Manage Network Connections
7. Find and Right click on the active Local Area Connection and choose Properties (If you’re hit with a UAC prompt, choose Continue)
8. Double-click on Internet Protocol Version 4 (TCP/IPv4)
9. Click on Use the following IP address
10. Enter a false IP like 123.123.123.123
11. Press Tab and the Subnet Mask section will populate with default numbers
12. Hit OK twice
13. Right click the active Local Area Connection again and choose Properties
14. Double-click on Internet Protocol Version 4 (TCP/IPv4)
15. Choose Obtain an IP address automatically
16. Hit OK twice
17. Check your IP to see if you have a new IP address

Some people have inquired about manually assigning their IP address. This IS possible, but you run a very high risk of your ISP banning you from connecting to the internet. To manually change your IP, follow the steps above for your Operating System. In step 9 or 10, depending on your O/S, enter an IP similar to the one displayed in the command prompt window. For example, if the IP displayed in the command prompt window is 75.1.2.3, change yours to 75.1.2.4. You’ll also need to manually enter the Subnet, Gateway and DNS Server IP addresses as well. If the new IP you give your computer doesn’t work, chances are someone else on the ISP network has already been assigned that IP. You’ll need to move on to the next one and keep trying until you find an open one. However, some ISPs match up your MAC or modem data to the IP that’s been assigned. If those 2 things don’t match up, you won’t be able to connect no matter what. If your router gets the IP and not your computer, you’ll need to http in to your routers interface and manually assign the IP there. It’s pretty much the same method as assigning the IP to your computer. The method that varies is in how you reach your routers interface. You can get the instructions from your manufacturer’s website.


MAC Cloning. What is a MAC address? A MAC address is a physical hardware address assigned to each device that has the capability of connecting to a network. The internet is nothing more than a large network. The MAC address is something that is assigned in the chip on the device and is not something the user can change. MAC cloning can only be done at your router providing it has those capabilities. Most ISPs assign their IPs based on the MAC address in your equipment. If the MAC address of your router is 00-11-22-33-44-55 and you connect to your ISP, the DHCP server records your MAC and assigns an IP. If you disconnect from the ISP, you lose your IP address. The next time you connect, the DHCP server sees your MAC, looks to see if it has assigned an IP address to you before. If it has and the lease time has not expired, it will most likely give you the same IP address you had before disconnecting. Why clone a MAC address? New MAC address most likely equals new IP. How to clone your MAC and if your router has this feature is dependent on the router itself. You’ll need to find the instructions on the manufacturer’s website.

Read more »

What Is An IP Address ?

IP Address (Internet Protocol Address):

This number is an exclusive number all information technology devices (printers, routers, modems, et al) use which identifies and allows them the ability to communicate with each other on a computer network. There is a standard of communication which is called an Internet Protocol standard (IP). In laymans terms it is the same as your home address. In order for you to receive snail mail at home the sending party must have your correct mailing address (IP address) in your town (network) or you do not receive bills, pizza coupons or your tax refund. The same is true for all equipment on the internet. Without this specific address, information cannot be received. IP addresses may either be assigned permanently for an Email server/Business server or a permanent home resident or temporarily, from a pool of available addresses (first come first serve) from your Internet Service Provider. A permanent number may not be available in all areas and may cost extra so be sure to ask your ISP.


Domain Name System (DNS): This allows the IP address to be translated to words. It is much easier for us to remember a word than a series of numbers. The same is true for email addresses.

For example, it is much easier for you to remember a web address name such as whatismyip.com than it is to remember 192.168.1.1 or in the case of email it is much easier to remember email@somedomain.com than email@192.168.1.1


Dynamic IP Address: An IP address that is not static and could change at any time. This IP address is issued to you from a pool of IP addresses allocated by your ISP or DHCP Server. This is for a large number of customers that do not require the same IP Address all the time for a variety of reasons. Your computer will automatically get this number as it logs on to the network and saves you the trouble of having to know details regarding the specific network configurations. This number can be assigned to anyone using a dial-up connection, Wireless and High Speed Internet connections. If you need to run your own email server or web server, it would be best to have a static IP.
Static IP Address: An IP address that is fixed and never changes. This is in contrast to a dynamic IP address which may change at any time. Most ISP's a single static IP or a block of static IP's for a few extra bucks a month.


IP version 4: Currently used by most network devices. However, with more and more computers accessing the internet, IPv4 addresses are running out quickly. Just like in a city, addresses have to be created for new neighborhoods but, if your neighborhood gets too large, you will have to come up with an entire new pool of addresses. IPv4 is limited to 4,294,967,296 addresses.


IP version 5: This is an experimental protocol for UNIX based systems. In keeping with standard UNIX (a computer Operating System) release conventions, all odd-numbered versions are considered experimental. It was never intended to be used by the general public.


IP version 6: The replacement for the aging IPv4. The estimated number of unique addresses for IPv6 is 340,282,366,920,938,463,463,374,607,431,768,211,456 or 2^128.
The old and current standard of addresses was this: 192.168.100.100 the new way can be written different ways but means the same and are all valid:
* 1080:0000:0000:0000:0000:0034:0000:417A
* 1080:0:0:0:0:34:0:417A
* 1080::34:0:417A

Read more »

What's The Difference Between A Static IP Address And A Dynamic IP Address?

A static IP is one that will never change. A dynamic IP is exactly that, dynamic. It could change frequently, or not change for more than 1 year. It really depends on how the DHCP server that’s assigns the IPs is set up.


Read more »

What Is DHCP ?

Dynamic Host Configuration Protocol ( DHCP )

     In simple terms, DHCP determines if your IP is static or dynamic. DHCP is controlled by a DHCP server. Your router can be a DHCP server...and if you're on a home network, it most likely is your DHCP server.

     I know this might be confusing because the word dynamic is in the term, but just because you have DHCP enabled on your computer doesn't mean you can't be assigned a static IP. DHCP enabled on your computer simply means you're letting a DHCP server assign its IP. Having it enabled DOES NOT mean it's a DHCP server.

     A true DHCP server (not your Linksys router) gives the LAN Admin a ton of control with IP assigning.
Ever print to a network printer? Ever wonder how that printer keeps its network assignment? Probably through DHCP. Each network device has a MAC address. You can assign a static IP at the DHCP server to a specific MAC address. This allows the network printer to always get the same IP even after it reboots and without assigning the IP at the printer. If you print the network configuration at the printer, it will probably tell you that DHCP is enabled and no static IP is assigned. That's because the IP assignment is handled at the DHCP server.

    Your ISP has a DHCP server. They can assign IPs by modem MAC addresses. When your modem comes online, it communicates to the network indicating it is looking for an IP address. The DHCP server listens to this communication and starts talking to the modem. The modem then transmits its MAC address to the DHCP server. At that point, either an IP has been reserved for the modem or one is assigned at that time. Hence cloning your MAC address to get a new IP from your ISP.

     Routers and DHCP - Under the General Setup or LAN Setup tab in your router, you'll see a settings option for DHCP. You can control how many IPs are assigned or to enable/disable the DHCP server portion of the router. If you disable it, you'll have to statically assign IPs to each computer, or have a DHCP server or your network. This goes for wired and wireless. Any connection on your network has an IP address.
There's a lot more to DHCP than this, but this is a basic explanation.
Read more »

Senin, 07 Juni 2010

Install Teamviewer ( Remote Desktop )


Hai Sobat semua kita ketemu lagi dalam kesempatan kali ini ....

nih ada mainan baru buat sobat semua ...TeamViewer

sebenarnya yg satu ini PR saya ditempat kerja... namanya juga PR.. yaaa harus dibawa dan di selesaikan di rumah... iya toh padahal sebenarnya PR ini harus dikerjakan dikantor, karena "korban" nya ada di kantor ... dan lebih afdol kalo langsung memperbaiki "korban" yg sekarat, lagian kalo di kantor kan bisa konek gratisan (maklum ... quota gw dah kritis)

Ok deh ... sekarang langsung aja ke topik bahasan :
yang saya maksud "korban" diatas adalah PC Server di kantor ....
begini nih ceritanya: (it's complicated and gak jelas) .... ya udaah deh ...

Instalasi

> Unduh Teamviewer disini
nb: Sesuaikan dengan Operating System yg dipakai.
> lakukan instalasi pada kedua PC dgn Versi Teamviewer yg sama.
> Jika berhasil terinstall kemudian buka program Teamviewer dan taampilannya kira" spt ini


Tampilan utama TeamViewer, jika sudah tampil (Ready to connect (secure connection)) maka anda siap melakukan koneksi ke PC lain, kemudian masukan ID PC klien jika koneksi berhasil maka akan muncul kotak “Password”, isi password teamviewer PC yang akan anda remote. Jika berhasil maka akan tampil desktop PC yang diremote tersebut.


Pada awal installasi awal muncul opsi ‘Start Teamviwer automatically with Windows’ bisa anda centang sehingga waktu komputer booting maka secara otomatis program remote dektop akan langsung running. Password bisa anda isikan untuk memudahkan anda meremote komputer yang anda tuju ketika anda hendak melakukan remote.


Jika anda ingin melakukan File Transfer, maka pilih “File Transfer” pada bagian pilihan yang terlihat dibawah kotak ID, kemudian klik “Connect to partner”.


Contoh Teamviewer versi 4
Jika ingin menggunakan password dan ID yang tetap maka cukup tempatkan kursor mouse pada bagian kotak password, maka akan tampil seperti gambar diatas, pilih “Set user definied password” kemudian masukan password yang anda inginkan.


Read more »

Teamviewer (remote desktop)


TeamViewer adalah suatu program yang cukup sederhana dan sangat mudah digunakan untuk beberapa keperluan terutama melakukan akses PC secara remote melalui internet.
Aplikasi ini sangat cocok digunakan untuk mengakses PC lain melalui internet, keunggulan utamanya adalah Gratis ... hayooo ... mau kan ????

Menurut situs resminya, dengan Teamviewer ini kita bisa mengakses komputer lain dimanapun dan kapanpun via internet, jadi ... kita bisa meremote PC lain jika ada koneksi internet dan pastinya kedua PC harus sudah terinstall Teamviewer. Bahkan katanya Software ini bisa digunakan cross-platform connections atau koneksi antar PC dgn OS yg berbeda ... Wahhh ... hebat kan !!!

Fitur utama TeamViewer adalah:

1. Remote Support
2. Presentation
3. File Transfer
4. VPN

jadi ... selain untuk Remote ... juga bisa transfer data juga.. langsung ke direktori yang kita mau. Hal ini memungkinkan kita untuk memperbaiki system PC, mengatasi bug, update dll, tetapi kita sebelumnya harus tahu ID dan Password PC yg akan di remote dan jika sudah .... treteteteteeeet.... kita bisa akses PC itu secara remote seperti kita ada di depan PC tersebut secara langsung.

salah satu kelebihan Teamviewer adalah "cepat dan stabil"
Syarat utama untuk dapat mengunakan teamviewer adalah:

* Install TeamViewer di kedua PC yang akan melakukan koneksi secara remote (versi sama)
* Koneksi internet sudah tersambung
* Masukan ID dan password PC yang akan diremote. ID dan Password dapat menggunakan mode dynamic maupun ditentukan sendiri, tergantung kebutuhan.
Read more »